Arm Cortex: L1 Cache Write-through
Access to cache data
Access to cache data is enabled by default on Cortex-M devices in winIDEA, requiring no additional configuration.
Understanding cache behavior and real-time observability
While the default behavior is sufficient in most cases, certain debugging scenarios require additional configuration.
If you are having issues with real-time observation of the variable values of the cache, these must be written in the data memory and not only held in the cache, since cache memory might not be accessible to the debugger.
In this case, you will need an EVE script or an INI file to enable L1 Cache Write-through. This configures the microcontroller to propagate writes of variables cached in the L1 cache and also to the memory. As a result, any changes made within the cache are also written to SRAM locations, which are accessible to the debugger.
The example below shows how the debugger might see variables in the memory:
|
Without Write-through |
With Write-through |
||
| Cache value |
Memory value |
Cache value |
Memory value |
| 0x00000000 |
0x000000E7 |
0x00000000 |
0x00000000 |
| 0x00000001 |
0x000000E7 |
0x00000001 |
0x00000001 |
| 0x00000002 |
0x000000E7 |
0x00000002 |
0x00000002 |
Solutions
Provided EVE script (Cypress Traveo II)
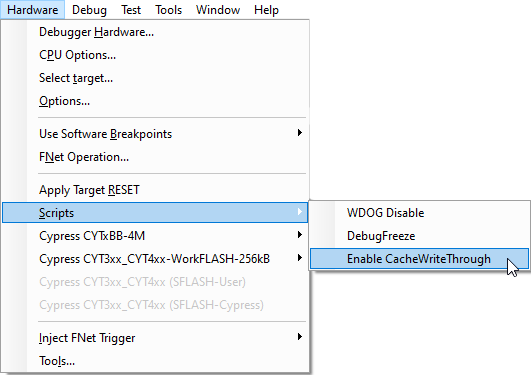
This solution is specific to Cypress Traveo II devices. You can use the provided EVE script to enable L1 Cache Write-through. The script sets the FORCEWT bit of the CM7_CACR register.
Execute Hardware | Scripts | Enable CacheWriteThrough.
The effect of the script is reset if the microcontroller goes through any kind of a reset and the variables being cached only will no longer be visible in the real-time Watch Window.
Custom INI file (Any Cortex M7 device)
1. Create an Enable_L1_Cache_WriteThrough.ini file and copy it into your winIDEA Workspace folder. The content of the INI file should be:
A CACR L 4 // set FORCEWT
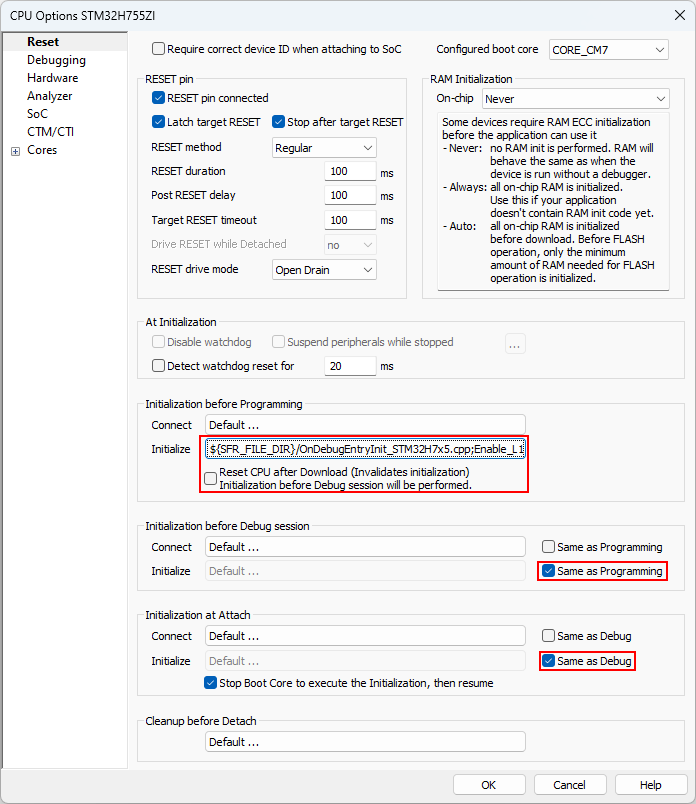
2. Go to Hardware | CPU Options | Reset | Initialization before programming | Initialize.
3. Select Custom in the dropdown menu.
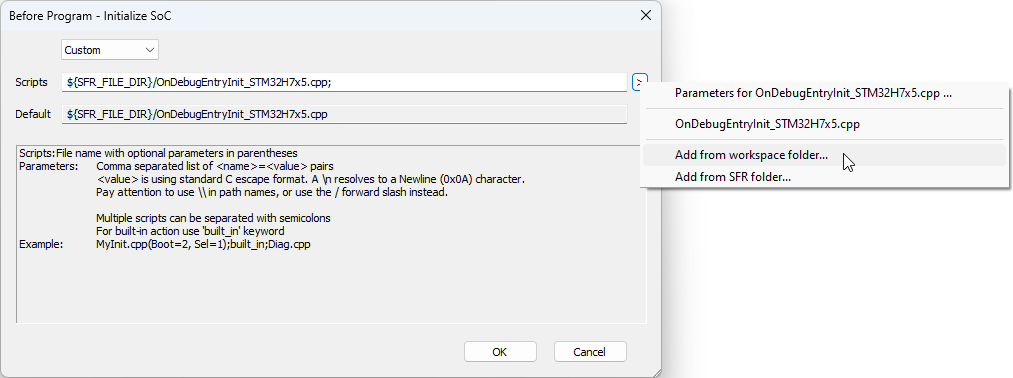
4. Click on the arrow button and select the Default initialization file, or copy and paste the file name into the Scripts field.
5. Click the arrow button to return to the menu. Select Add from workspace folder and select the INI file.
6. Go back to Hardware | CPU Options | Reset and carry out the following:
- Disable Reset CPU after download (Invalidates initialization), otherwise Cache Write-through will be invalidated.
- Enable Initialization before Debug session | Initialize | Same as Programming
- Enable Initialization at Attach | Initialize | Same as Debug
More resources in winIDEA Help
Similar topics
- Arm Cortex Cypress Traveo II: Supervisory Flash (SFLASH)
- Arm Cortex Cypress Traveo II: Debug session initialization prerequisites
- Arm Cortex Cypress Traveo II: Reading from a Work Flash results in random data
- Arm Cortex NXP LPC1xxx: Read protection (CRP) area at 0x2FC
- Arm Cortex NXP LPC: Internal Flash Programming