TLM: Raise priority of the primary Ethernet adapter to assure proper security ID
When using virtual machines as license servers, the MAC addresses or
priorities can vary (for example, after reboots or updates), which may
invalidate the security ID. The Overview
section in the TLM user guide notes that virtual license server licenses are
more the exception than the rule. This is because the TLM licensing system
takes a snapshot of the hardware, of which the CPUID and MAC address are
only a subset. This approach makes sure that all licenses are used within
the confines of the license agreement.
With the introduction of
virtual systems, TLM was adapted to accept execution on VMs as well,
specifically license servers, while maintaining the strict checking of the
system parameters. The rules and system requirements remain the same, as
outlined in the Overview section of the TLM user guide.
However, you can change the Ethernet adapter's priority with Windows.
Possible solution
Using PowerShell
1. Launch PowerShell as Administrator.
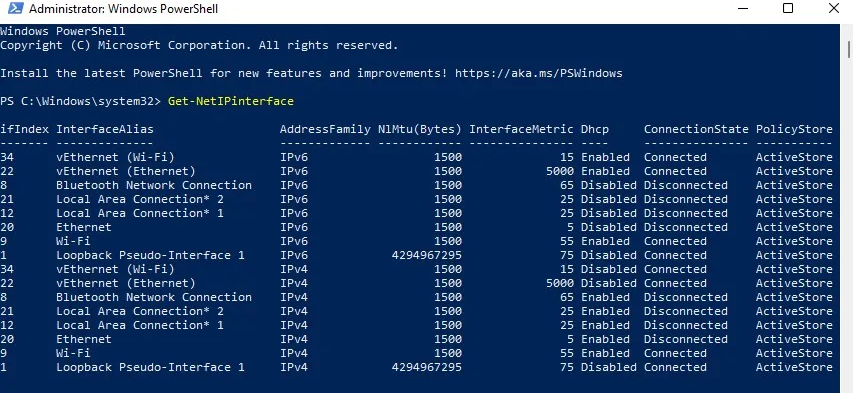
2. Run the following command in the PowerShell window.
Get-NetIPinterface

The results show the list of networking adapters active on your computer. Here, InterfaceMetric displays the priority for each adapter, where a lower number means that the adapter will take higher priority over others.
Set-NetIPInterface -InterfaceIndex “XX” -InterfaceMetric “YY”
Set-NetIPInterface -InterfaceIndex “5” -InterfaceMetric “1”
ipconfig /all
Using the Control Panel
2. Right-click on the network connection you want to change and select Properties.
The PowerShell CLI is quicker and easier and - in addition - you can automate the step, that is, by adding it to the startup process as a PowerShell script to be executed. This will set the priorities right each time the machine is started.
More resources
- TASKING License Management System - Overview
- TLM Documentation - User Manual (PDF)
- TLM Online Documentation - WebHelp
- TLM Downloads
Same category topics
Similar topics
- TLM: Node-locked client based license: F104: protection error: No valid license available
- Connecting the BlueBox directly to the PC via the Ethernet cable
- Emulator buffer is full
- TLM: Server upgrade instructions on Windows to v2.1 and higher
- TLM: Install and start a local license server on a Linux host as a systemd service